Introduction
This is the fourth exercise of the Basic Level. The main goal of this exercise is to give you an idea of how to setup and manage Xporter Permission Schemes.
Permission schemes enable administrators to define which Projects, Issue Types, User Roles, and Groups will be allowed to use Xporter, as well as manage the templates used on each of those available Issue Types.
For more information, please check our documentation here.
In order to perform the initial setup, navigate to Permission Schemes on the Xporter administration section page of the Jira Administration.
You'll see a warning informing you There are no Xporter Permissions Schemes configured and + Add button.
Once a Permission Scheme is configured, it will be displayed on that grid.
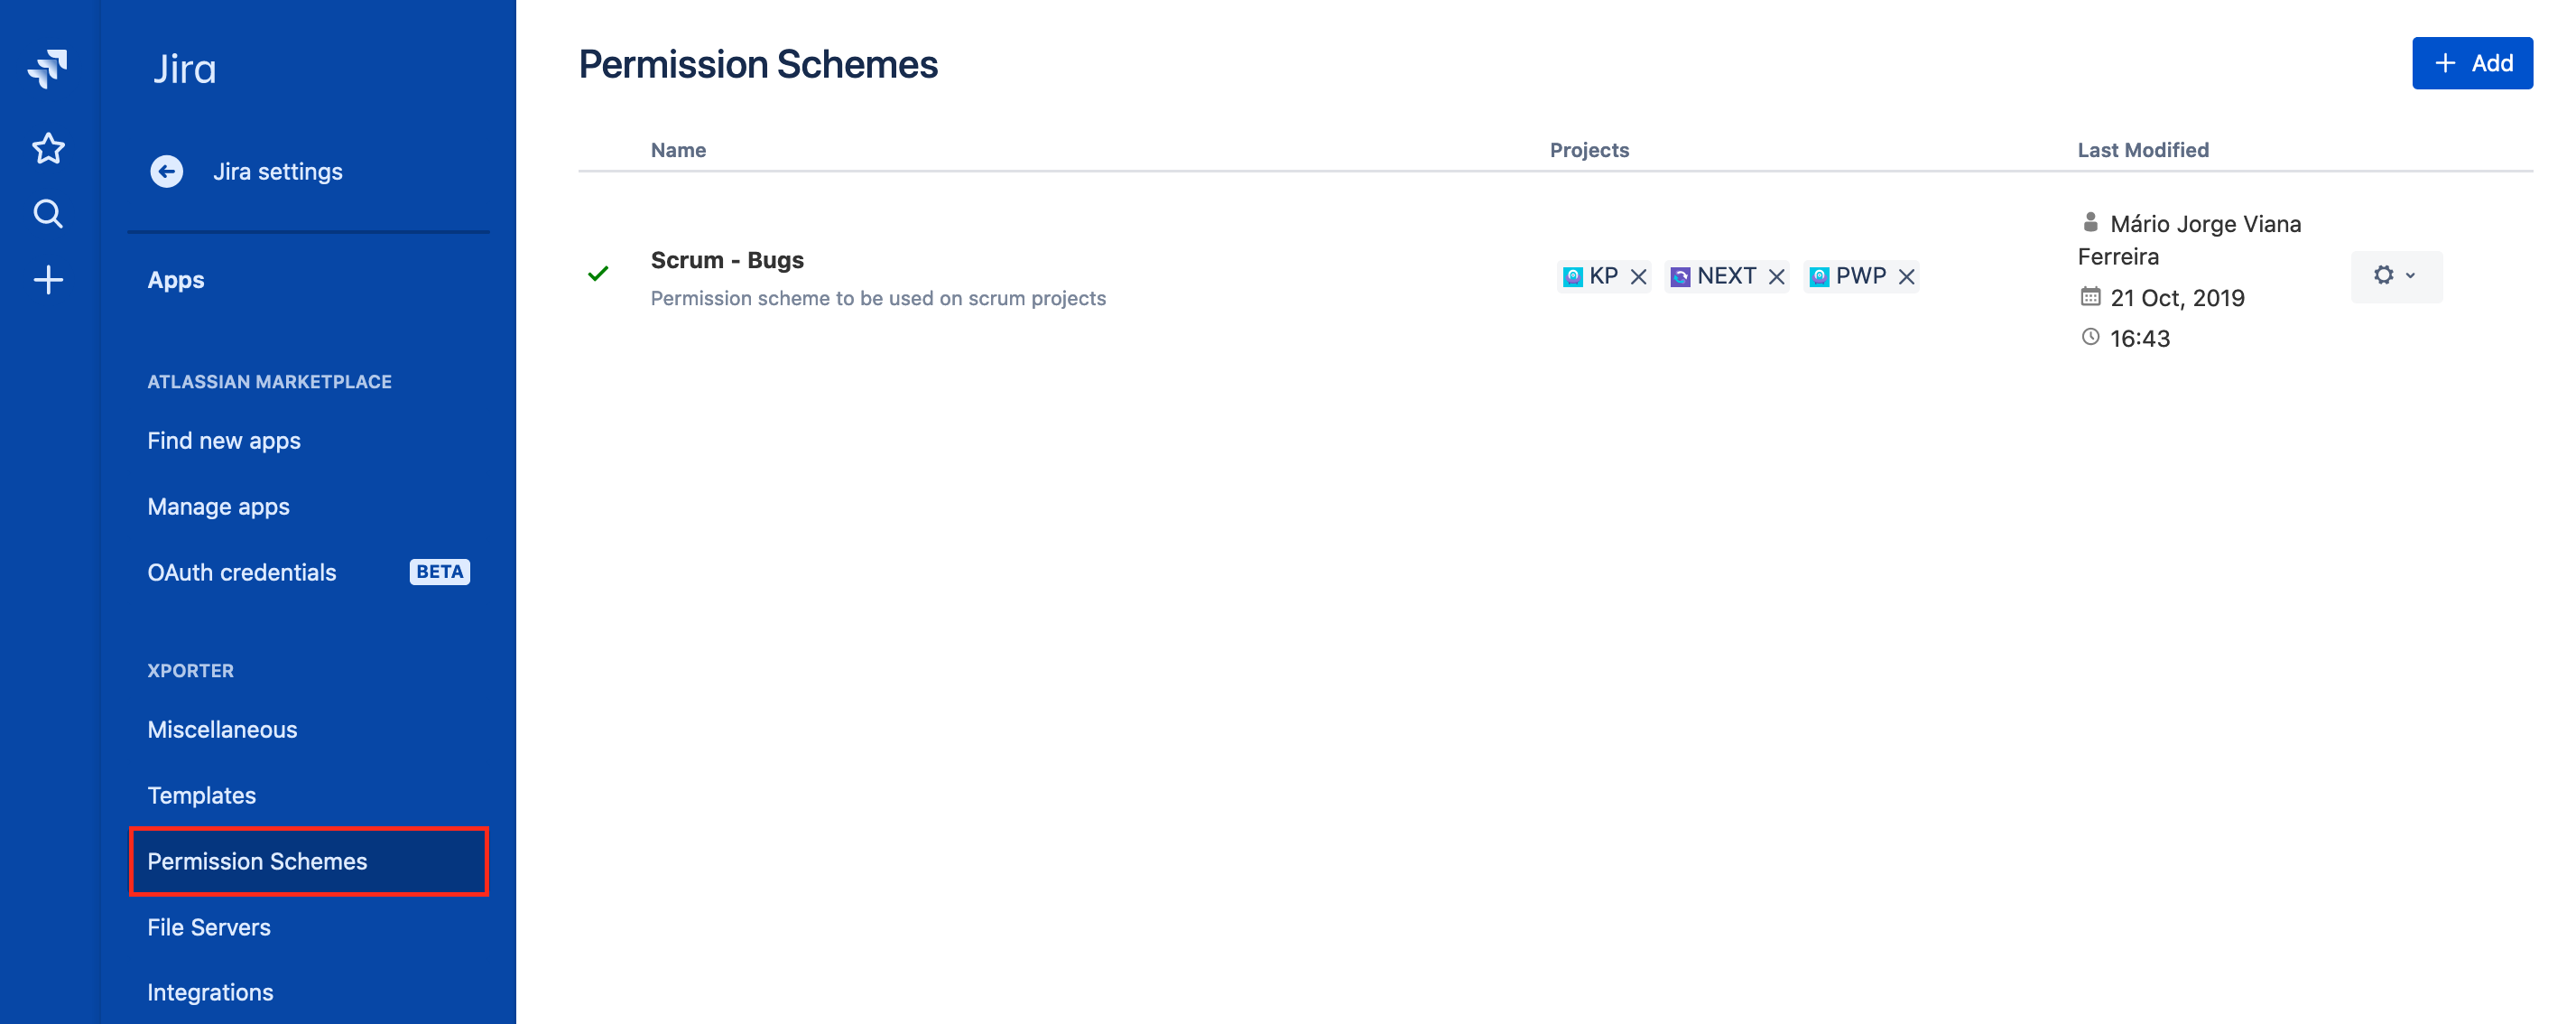
Right now, the only option available to you is the + Add button, that will display a pop-over dialog where you'll input your Permission Scheme name and description.
In order to perform this exercise properly, please create a Basic software development Project on your Jira instance, and name it as Academy.
Install at least 2 templates.
Create a new Jira user named Arthur and let it be associated only with the jira-software-users Group (it will be by default).
After that, on the sidebar of Jira Administration -> System, under Security, access Project roles and add a Project Role named King.
Finally, go to the project Academy -> Project settings. On the sidebar, access Permissions and edit permissions to add the role King to the permission Administer Projects.
Select Add users to a role, and on the dialog, add the user Arthur to the role King.
After all that is done, create a Bug issue, a Task issue and a Story issue for your Project.
Adding a Permission Scheme entry
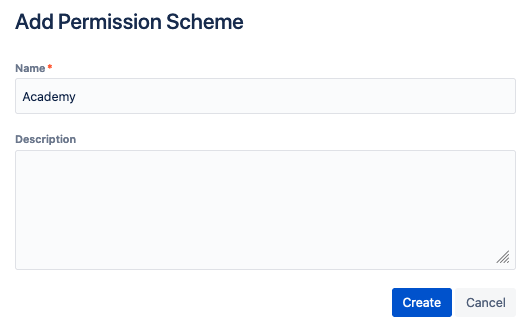
On the Permission Schemes on the Xporter administration section page of the Jira Administration, click + Add button and fill in the name and description of your Permission Scheme.
Name it Academy and click Create. A Success message will be displayed informing you that the Permission Scheme was successfully added.
It will be displayed with an entry on the Xporter for Jira Permission Schemes grid.
If the Permission Scheme name is already in use, an Error message will be displayed when you click Create to inform you of that conflict.
Editing a Permission Scheme entry
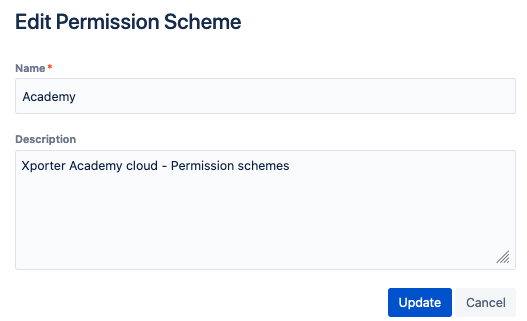
On your newly created Permission Scheme entry, click Edit on the Operations column, and a pop-over dialog will be displayed.
Enter a Description of your Permission and click Update. Your Permission Scheme entry will have its newly edited description displayed as well.
When editing, you can change the name and description of your Permission Scheme.
Configuring the Permissions of a Permission Scheme entry
On your created Permission Scheme entry, click Permissions on the Operations column.
You will be redirected to the Permissions page, where you can define the permissions of the Permission Scheme.
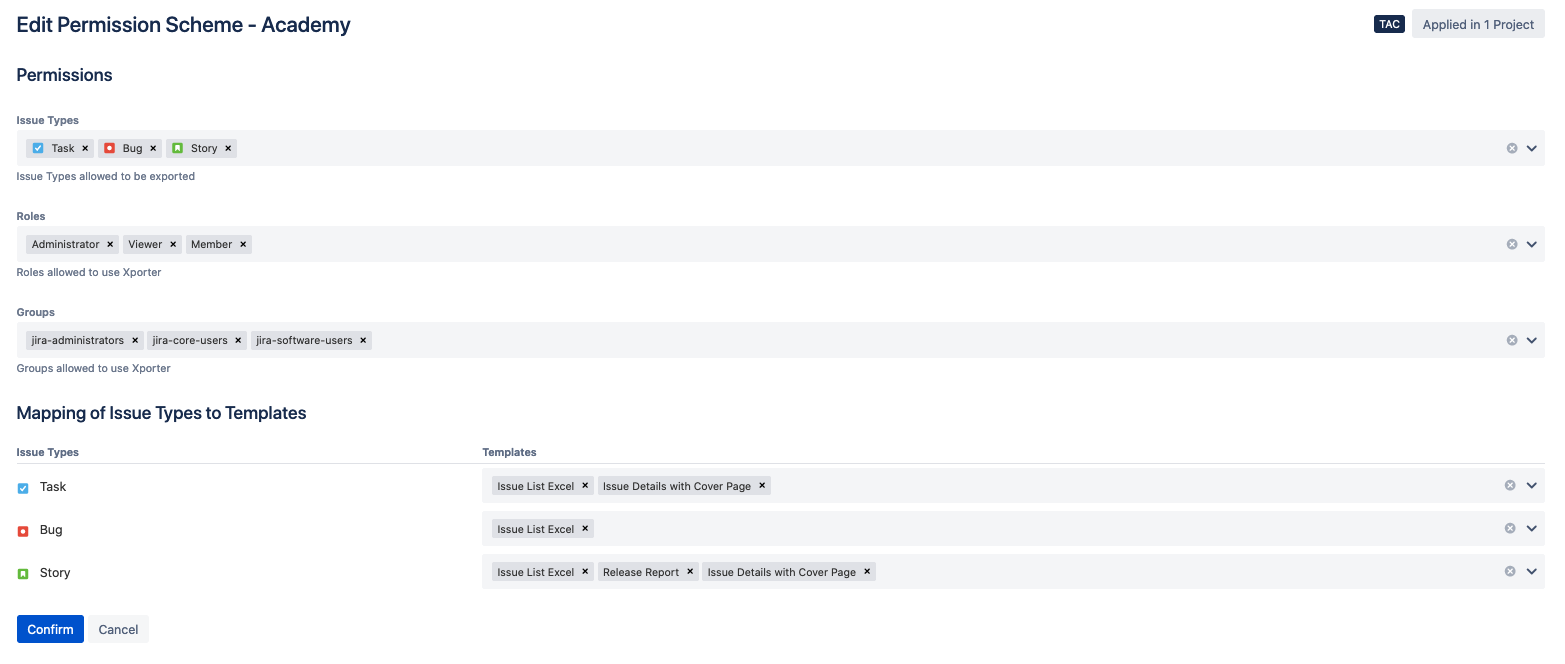
Here, you can define the:
- Issue Types that are allowed to be exported;
- Roles that are allowed to use Xporter;
- Groups that allowed to use Xporter.
You can also
- Map issue types into corresponding templates, so that for specific issue types, only specific templates will be available.
a. Defining the Issue Types that are allowed to be exported
Click on the Issue Types dropdown and pick only Bug, Story and Task.

b. Defining the Roles allowed to use Xporter for Jira
Click on Roles dropdown and select the King role

c. Defining the Groups allowed to use Xporter for Jira
Here you can view all the groups available but do not assign any group here.
d. Mapping of Issue Types to Templates
Here we already have the issue types allowed to export. We need to associate the templates available for each of the issue types.

Even though all templates will be available to be assigned on Issue Types, their Scope settings are still respected.
Therefore, if you assign a template with only an Active Scope to Single Export, you won't be able to Bulk Export with it.
Associating a Project with a Permission Scheme
Go back on the Permission Schemes on the Xporter administration section page of the Jira Administration.
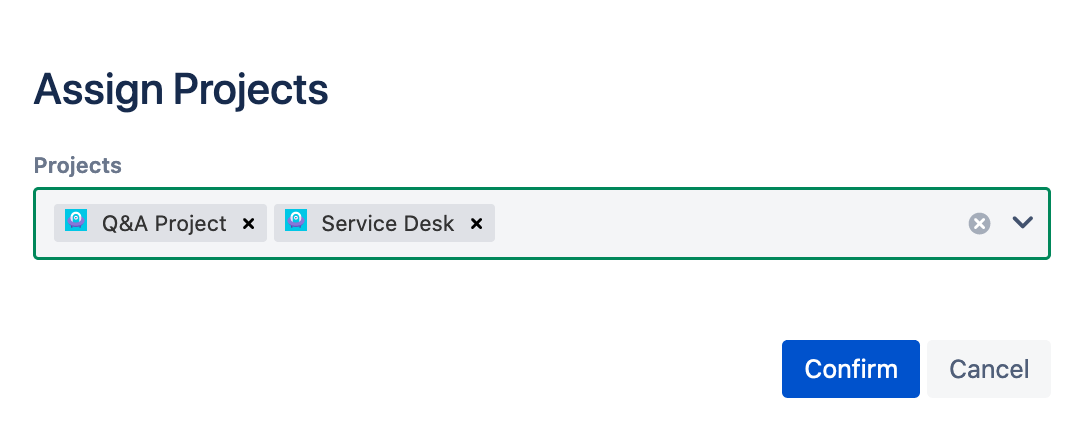
On our created Permission Scheme entry, click Projects on the Operations column, and a pop-over dialog will be displayed.
On the pop-over dialog, select only the Academy project. The project will now be listed under the column Projects of our created Permission Scheme entry.
Copying a Permission Scheme
On our created Permission Scheme entry, click Copy on the Operations column. A Success! message will be displayed, along with a new entry that will be listed, named Academy (Copy).
Only the name, description and permissions are copied. This copy will not contain any project.
Deleting a Permission Scheme
On the Academy (Copy) Permission Scheme entry, click Delete on the Operations column, and a prompt dialog will be displayed asking if you're sure about deleting the Permission Scheme.
Click Confirm and that entry will be removed.
Exercises
Enabling Permission Schemes configurations
With all the Permission Schemes setup done, navigate to the Miscellaneous on the Xporter administration section page of the Jira Administration, and on Enable Xporter for Jira for all projects and all users under Global Permissions, tick Off and click Save.
Also, make sure the Enable Xporter for Jira panel on Single Issue View is ticked On.
With this option set to Off, only the Projects, User Roles, Groups and Issue types as well as associated templates configured on the Permission Schemes are allowed to use Xporter.
On a new browser window, logged in as Arthur, navigate to the Story issue type of the project Academy. You will notice the Xporter panel isn't displayed on the right sidebar.
Click on the Xporter button to export multiple issues and a pop-up will display an Error message informing that you are unable to export the selected issues.
Here we explain why the user cannot export that issue, informing that the User has no permissions for using Xporter in current Permission Scheme.
Exporting issues within a Permission Scheme
Still logged in as Arthur, navigate to the Bug issue type of the project Academy, and you will notice the Xporter panel is displayed on the issue side view. However, on the Template selector, the only available option will be the template you've set up on the Permission Scheme definition to that issue type. Using the Xporter bulk button, the same options will be listed.
If you now try to bulk Export only the Bug and Task issues from the project Academy, an Error! message will still be displayed informing you that you are unable to export the selected issues. Clicking the Check Details button, an Error Reporting pop-over will be displayed because they don't have a common template assigned on the permission scheme definitions.
With your user with Administration access, navigate to the Permission Schemes on the Xporter for Jira administration section page of the Jira Administration, click Permissions under the Operations column of your entry, and map a common template to both the Bug and Task issue types.
Back on the browser using the user Arthur, try to bulk Export the Bug and Task issues from the project Academy again. This time, you'll be able to complete the operation.
Exporting issues with an unauthorized user
With your user with Administration access, navigate to the Permission Schemes on the Xporter for Jira administration section Apps page of the Jira Administration, click Permissions under the Operations column of your entry. Click on the Groups dropdown and select jira-administrators. Also, remove the King under the Roles.
Now, back to the browser using the user Arthur, try to bulk export the Bug and Task issues from the project Academy again. An Error message will be displayed informing you that you are unable to export the selected issues. The Error Reporting pop-over will be displayed, with an entry informing you that your user doesn't have permissions.
This Configuration level is now complete.
If you like this exercise, please leave a comment or a ![]() . Your feedback is very important to us.
. Your feedback is very important to us.
Thank you in advance. Enjoy our product. ![]()