Introduction
This is the fifth exercise of the Basic Level. The main goal of this exercise is to show you how to use the License Management section.
The License Management section allows you to view information about your license, and also allows you to install a license that has been directly provided by Xpand Add-ons or the Xpand-Addons Marketplace.
Licenses provided by Atlassian or acquired in the Atlassian Marketplace should not be installed on this screen. For those licenses, follow the instructions here.
Xporter for Jira Cloud
The License Management screen is not available in Xporter for Jira Cloud because only Atlassian licenses are allowed there. They are managed in Manage Add-ons administration page.
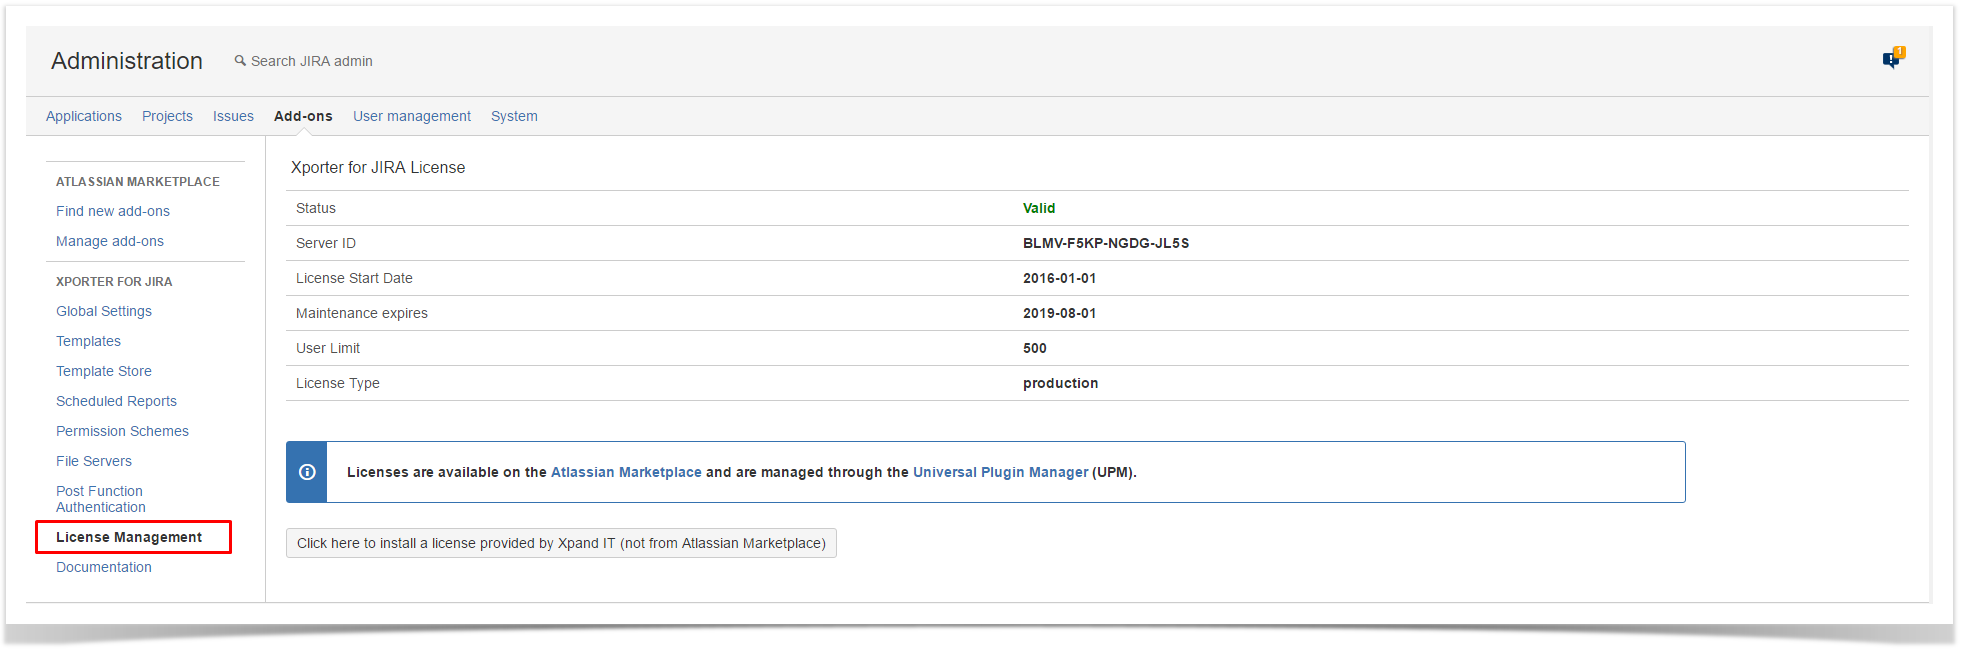
Navigating to the License Management on the Xporter for Jira administration section Add-ons page of the Jira Administration, you'll see the Xporter for Jira License screen, with the following information:
- Status of the Xporter for Jira License in use on your Jira instance;
- Support entitlement number (SEN), this field must be used when you need to get support from our team;
- Organization name;
- Server ID of your Jira instance;
- License Start Date of the Xporter for Jira License in use on your Jira instance;
- Maintenance expiration date of the Xporter for Jira License in use on your Jira instance;
- User Limit of the Xporter for Jira License in use on your Jira instance;
- License Type of the Xporter for Jira License in use on your Jira instance;
The Exercise(s)
In order to perform this exercise properly, we'll start by having no Xporter for Jira license in use.
In the Global Settings, turn Off the Enable Xporter for Jira for all projects and all users, and turn On the Enable Xporter for Jira panel on Single Issue View. Click Save.
1) Viewing your License information and adding an Atlassian Marketplace license
Navigate to License Management on the Xporter for Jira administration section Add-ons page of the Jira Administration and you'll see the Xporter for Jira License screen. You will see Your Xporter for Jira License is not valid! Please purchase Xporter for Jira with a valid license or request a trial license displayed next to its Status. You will also see License is Missing on the remaining entries.
On a different tab, navigate to any issue on your Jira instance. On the Xporter for Jira panel on the right sidebar, an Error! message Invalid or Missing License! Please install a valid Xporter for Jira License will be displayed. If you try to bulk export, the same message will be displayed.
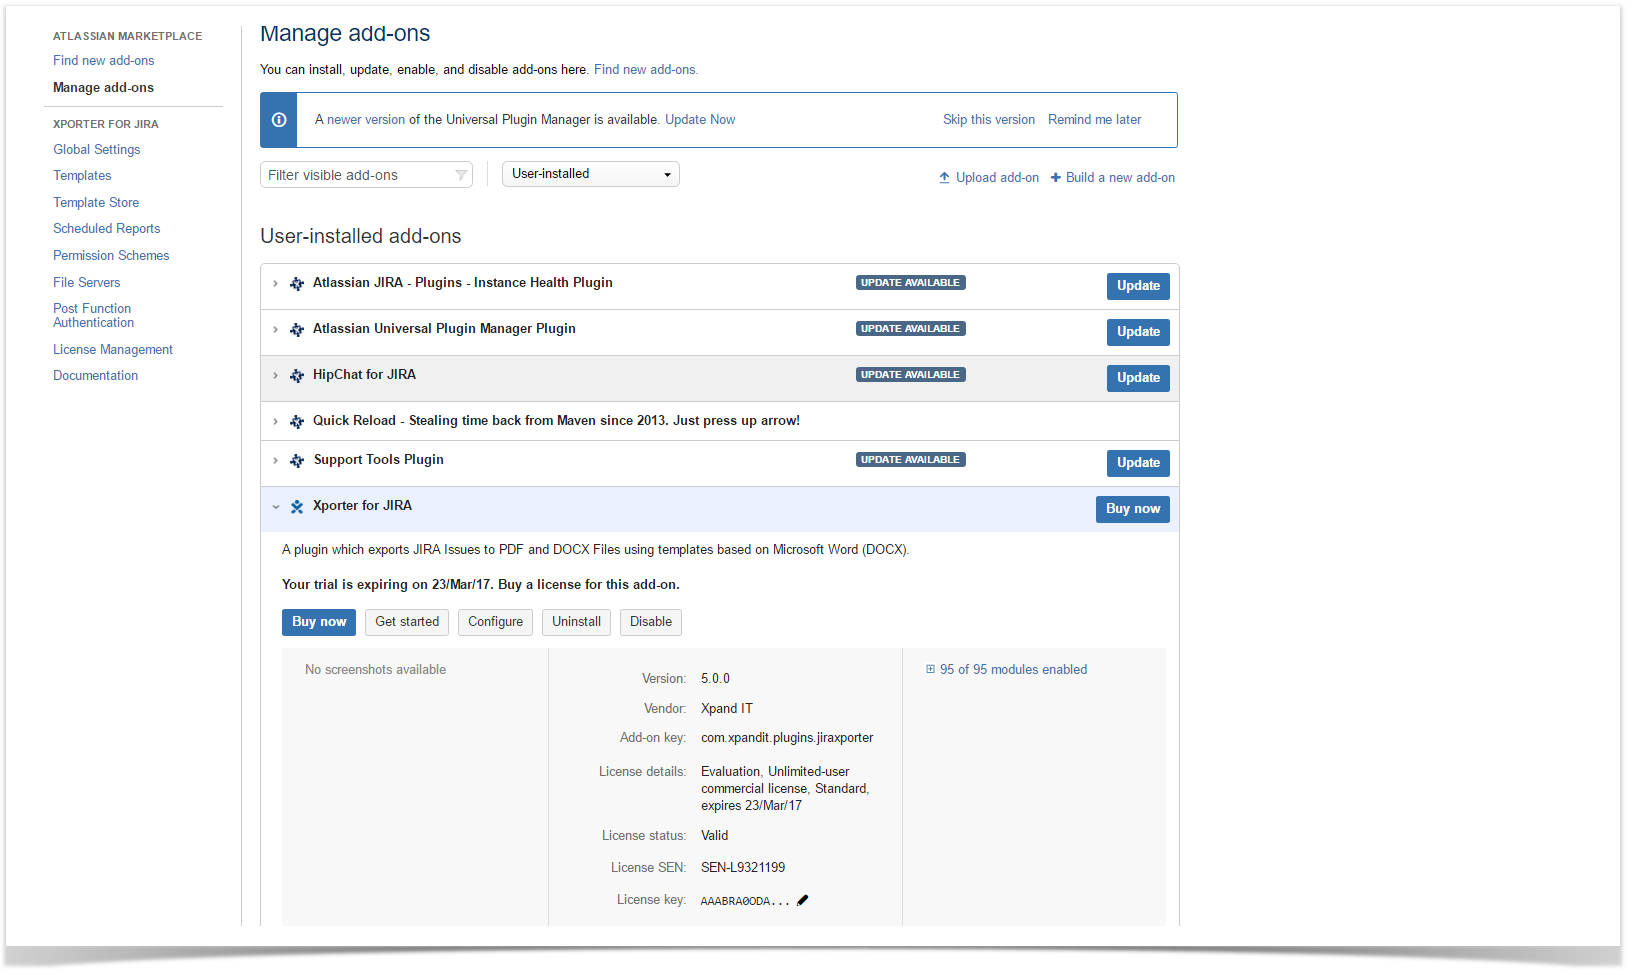
Back to the Jira Administration tab, navigate to the Manage Add-ons section on your left sidebar, and scroll down to the Xporter for Jira entry. Expand it and click the Free Trial option. A pop-over prompt to Accept terms and agreements will be displayed, Accept it and input your Atlassian account login data. Log In, and after the success message, Close the pop-over.
To create an Atlassian Account, just sign up here. It's free, and you can use it to request 30-day trials of its numerous marketplace apps.
Navigate again to License Management and you'll see the Status now is displayed as Valid, and all the remaining fields will be properly populated. Please note the License Type information says you're using a Trial (Atlassian Marketplace) license.
Back on your issue navigator tab, the Xporter for Jira panel on the right sidebar will be properly displayed, and you can go ahead and export it. Perform a bulk export as well. When you open your generated documents, you'll notice the footer will display the message Evaluation only. Created with a Trial Version of Xporter for Jira. Since this is a trial license, this is expected.
If you have an Atlassian Marketplace Production license, you can follow the same steps, but no Trial message will be displayed in the document footer.
2) Setting up your Xpand-Addons Marketplace Account
Besides the Atlassian Marketplace licenses, you can also obtain both Production and Trial Xporter for Jira licenses through the Xpand-Addons Marketplace.
We're now going to learn how to use them.

First, go to the Xpand-Addons Marketplace and click Sign Up. Fill out the form. When you're done, wait for the Activation email to arrive. Follow the Activate Your Account link contained in it, and then just Sign In.
At the top of the page, click Products, and on the Apps Available page, scroll to Xporter and View Details. On the new page, scroll down again to the Try dropdown, and select the User Limit of your Jira instance.
Since you've installed an Atlassian Marketplace trial account on the previous exercise, you can verify it on the License Management on the Xporter for Jira administration section Add-ons page of the Jira Administration, next to the User Limit entry.
After that, a new page will be loaded, and you'll be prompted to input your Jira instance Server ID. Fill it out and click Checkout.
As in the User Limit, you can verify your Jira Server ID on the License Management on the Xporter for Jira administration section Add-ons page of the Jira Administration, next to the Server ID entry.
You'll be redirected to your account Licenses page, and there will now be a Xporter for Jira entry. Under Actions, click View, and the entry will expand with all the license details. Now, just copy your License Key.
3) Adding a Xpand-Addons Marketplace License
Back to your Jira instance, navigate to License Management on the Xporter for Jira administration section Add-ons page of the Jira Administration. Click on the Click here to install a license provided by Xpand IT (not from Atlassian Marketplace) button. At the bottom of the grid with the license details, select Remove. A Warning! message will be displayed, informing Sorry, you cannot update your market license on this screen. Please use the Plugin Manager instead, which is expected because you're trying to remove an Atlassian Marketplace license on a Xpand-Addons Marketplace license field.
Go then to the Manage Add-ons section on your left sidebar, and scroll down to the Xporter for Jira entry. Expand it and Edit the License Key entry, deleting the contents of the field and replacing them with your Xpand-Addons Marketplace license. Click Update. An Error! message will be displayed, informing Your app license is invalid. Ensure that the entire app license, including line breaks, is exactly as provided, which is expected since you're trying to input a Xpand-Addons Marketplace license on an Atlassian Marketplace license field.
Just leave the License Key field empty, click Update and return to License Management on the Xporter for Jira administration section Add-ons page of the Jira Administration.
Go to the Click here to install a license provided by Xpand IT (not from Atlassian Marketplace) button at the bottom of the grid with the license details. Click it to expand, paste your Xpand-Addons Marketplace license and click Add. A Success! message informing License successfully added, and all the fields will be properly populated.
On your issue navigator tab, the Xporter for Jira panel on the right sidebar will be properly displayed, and you can go ahead and export it. Perform a bulk export as well. When you open your generated documents, you'll notice the footer will display the message Evaluation only. Created with a Trial Version of Xporter for Jira. Since this is a trial license, this is expected.
If you have a Xpand-Addons Marketplace Production license, you can follow the same steps, but no Trial message will be displayed in the document footer
Congratulations! You have completed the Basic level ![]() Please proceed to the next level.
Please proceed to the next level.
If you like this exercise, please leave a comment or a ![]() . Your feedback is very important to us.
. Your feedback is very important to us.
Thank you in advance.
Enjoy our product. ![]()